How to set up Google Analytics for informed web design
Data is vital to decision making. This article will help you start tracking data on your website using Google Analytics and Google Tag Manager so you can start making better, more informed decisions you can easily measure.
Why do you have a website?
I have my website not to just sell web design services. For me, I want my website to sell my services for me. I want it to bring me new potential customers that have been prequalified. That’s the why I have my site for my business. It’s important, however, to remember that your site isn’t really just for you. Your website if for its users. The only way to really know what your users want and how they use your site is to track it.
By tracking clearly defined metrics over time, you’ll be able to measure and watch the effectiveness of your decisions. If you are considering a website redesign, then you are gathering priceless information that can inform any web designer or developer you work with.
I’ve been using Google Analytics (GA) for years and it is a single tool that provides valuable information on a daily basis. I’ve experimented with other tracking services, but personally, I treat them as supplementary to Google Analytics; never replacing only adding. Follow along below to get started.
Set up Google Tag Manager and Google Analytics For More Informed Web Design
Recently, I have been using Google Tag Manager (GTM) to handle all analytics codes and event tracking. It makes managing multiple codes across services and domains really simple and centralized.
To get started, create a GTM account and GA account:
- Create an account for Google Analytics
- Sign in to GA and navigate to Admin. Under the Property drop-down select Create new property. Complete the next steps and get the Tracking ID
- Sign in to Google Tag Manager and Create Account. Create a new account and follow the steps to set up a new Web container
- The tracking code you receive needs to be included on every page you want to track
Add Google Analytics to Google Tag Manager
Now that you have a GTM account we actually need to load the GA tracking code inside of a tag.
What is a tag? A tag is a piece of code that sends data to a third party. GTM allows you to set up multiple tags and control how they are fired, or executed. Create a tag for Google Analytics:
- Sign in to GTM and click New Tag
- Name your tag “GA – Pageviews” and click Google Analytics
- Click Universal Analytics
- Add your Tracking ID for GA. Get it from your GA account in Admin > Tracking Info > Tracking Code
- Set Track Type to Pageview and click Continue
- Choose All Pages for Fire On and click Create Tag
- Click Publish in the top right to make the changes live
Add Google Tag Manager to your site
The last step to setting up tracking on your website is to embed the code. This code acts as a container, inside of it GTM will load any tags you have defined such as Google Analytics, Adwords, Hotjar, crazyegg, etc.
If you use a CMS, like WordPress or Drupal, you could try a plugin. WordPress, for example has a number of plugins. DuracellTomi’s Google Tag Manager for WordPress looks good. It boasts an automatic data layer, pushing data to Google Tag Manager and triggering events. Drupal has a module for managing Google Tag Manager as well.
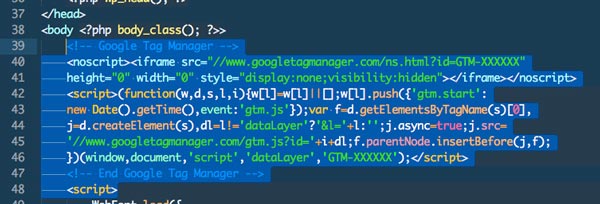
If you’re not currently on WordPress, manage the files yourself, or have someone managing your site for you; have the code pasted into the HTML of every page you’re tracking. This is done by placing the code provided from GTM just inside the opening <body> tag in your HTML.

Click the GTM ID to get your embed code
- Sign in to GTM and click the GTM ID to the right of the account name
- Copy the code
- Open the file that contains the opening <body> tag of a page you want to track
- Paste the code from GTM on the line below the <body> tag
- Save the file(s) and upload them to your server
- Verify its working

Paste the embed code immediately after thetag in your HTML
I like to manually check things are working. Check if Google Tag Manager is installed properly by visiting your website and viewing the source. Find on this page the script reference to Google Tag Manager which should contain this “www.googletagmanager.com.” Viewing source code varies by web browser, here are instructions for a few:
- Chrome: Go to View > Developer > View Source or Right Click > View Page Source
- Safari: Go to Develop > Show Page Source or Right Click > Show Page Source
- Firefox: Tools > Web Developer > Page Source or Right Click > View Page Source
You’re all set! Now get back to business and let the data start collecting. Once you’ve had at least two–four weeks of data you should have a big enough sample to start analyzing and understanding user behaviour.
Coming up, I’m writing some more article to show you:
- how to set up triggers and events in Google Tag Manager
- how to report on events in Google Analytics and calculate conversion rates
If you have any questions or thoughts on anything you read here, please leave a comment below.


